Budget DIY Gaming PC Building Guide 2025
Building a budget gaming PC in 2025 fits perfectly without wrecking your bank account. Start with a strong base by choosing a solid mid-range CPU, like Ryzen 5 or Core i3, and pair it with a wallet-friendly GPU such as the GTX 1650 or RX 6500 XT. Skip the pricey DDR5 RAM and grab DDR4 instead to keep costs low. Mix up your storage with a speedy SSD and a roomy HDD to cover all bases. Forget flashy RGB cases and fancy liquid cooling—stick with reliable air cooling and an 80+ certified power supply for smooth performance. Picking parts smartly and assembling carefully turns into a gaming machine that packs a punch without emptying pockets. This setup thrills anyone craving great games without the big price—keep reading to unlock insider secrets for the perfect build.
Key Takeaways
- Focus your budget on the graphics card while saving money with previous-generation CPUs like Ryzen 5 5600G or Intel Core i3-13100F.
- Start with 16GB DDR4 RAM and an NVMe SSD + HDD combo to balance performance and cost-effective storage.
- Choose a 500W+ 80 Plus certified power supply to support current needs while allowing room for future upgrades.
- Verify component compatibility using pcpartpicker.com before purchasing, especially CPU socket type and motherboard combinations.
- Skip expensive liquid cooling and RGB accessories, opting instead for stock coolers and practical cases with good airflow.
Setting Your Budget Strategy
Building a budget gaming PC requires a clear-cut strategy that starts with determining your core priorities. Consider researching current market pricing trends to make informed decisions. You’ll want to focus on what matters most – getting the best gaming performance for your money without breaking the bank.
Since you’re building a gaming rig, you should allocate the biggest chunk of your budget to your graphics card, as it’ll be doing the heavy lifting in most games. Looking at the latest releases, the RX 8000 series will offer great mid-range options starting January 2025.
Before you start picking parts, you’ve got to be honest about your financial limits and practical needs. Don’t get starry-eyed over fancy tempered glass cases or RGB everything – these extras can eat up your budget fast!
Instead, focus on the essentials: a solid GPU, compatible motherboard, and reliable power supply that’ll support your system’s needs. You’re better off investing in performance rather than flashy aesthetics.
Remember to factor in those often-forgotten extras like thermal paste, cable ties, and maybe a basic toolkit.
And here’s a pro tip: plan for the future! Choose components that’ll make upgrading easier down the line. This way, you’re not just building for today – you’re investing in tomorrow’s gaming sessions too.
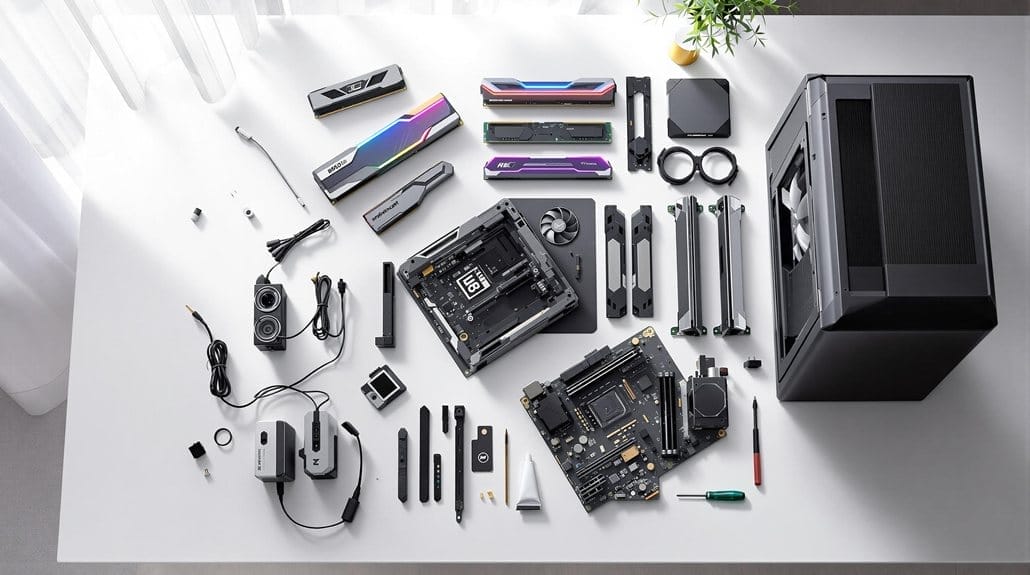
Essential Parts List
You’ll need to pick out several key components to build your dream gaming PC, and we’ve got the perfect budget-friendly parts lined up for you.
From powerful yet affordable CPUs like the Ryzen 5 5600G or Intel Core i3-13100F to graphics cards like the GTX 1650 or RX 6500 XT, you can build a fantastic gaming rig without breaking the bank. Regular price monitoring can help you score amazing deals on these components. A full-modular PSU will make cable management much easier during your build.
The best part is that by choosing components like a reliable B550 or B660 motherboard, 16GB of RAM, and a speedy NVMe SSD, you’re setting yourself up for both great performance now and easy upgrades in the future.
Core Components Breakdown
The heart and soul of any gaming PC lies in its core components – the essential parts that work together to create a functional system.
You’ll want to start with a powerful CPU that matches your motherboard‘s socket type, whether it’s the latest AM5 or LGA1700. Don’t worry if you’re feeling overwhelmed; these components are like puzzle pieces that need to fit perfectly together. Make sure to select a PSU above 500W to adequately power all your components. For optimal gaming performance, consider CPUs with 6-8 cores as they provide the best balance.
Your motherboard is the foundation that’ll connect everything, so you’ll need to choose one that supports your chosen CPU and has enough PCIe slots for your graphics card and other add-ons.
When it comes to memory and storage, you’re looking at a minimum of 16GB RAM and preferably an SSD for lightning-fast load times.
- The CPU acts as your PC’s brain, so prioritize cores and clock speed within your budget
- Your motherboard choice will determine future upgrade possibilities, so don’t skimp here
- RAM and storage are like your PC’s short-term and long-term memory – get the best you can afford
Budget-Friendly Parts Selection
From entry-level to mid-range gaming, selecting the right components at the right price points makes all the difference.
You’ll be thrilled to know that today’s market offers incredible value across every essential component category, letting you build your dream gaming rig without breaking the bank.
For the heart of your system, you can’t go wrong with the Intel Core i5-14400F at $154 – it’s a sweet spot for price-to-performance ratio. Upgrading to the AMD Ryzen 5 7600X will provide even better performance with future AM5 upgrade potential. The Arc 8580 graphics card offers similar performance to the RX 6600 while being budget-friendly at $180.
Pair that with the budget-friendly yet capable XFX SWFT319 Radeon RX 6800 at $360, and you’ve got a powerhouse combo that’ll crush your favorite games.
Don’t forget the memory – Patriot’s Viper Elite II DDR4-3600 32GB kit at $55 is an absolute steal!
Storage won’t empty your wallet either – grab the important P3 Plus 1TB for just $59, and you’re set for lightning-fast load times.
Power it all with the reliable Corsair CX750M ($74), and house everything in the surprisingly feature-rich Phanteks XT Pro case ($49).
If you’re watching every penny, the stock CPU cooler will do just fine to start – you can always upgrade later when your budget allows.
Finding The Best Deals
Smart planning sits at the heart of finding PC component deals in 2025. You’ll want to start by setting a clear budget and keeping track of major sales events like Black Friday and Boxing Day.
Don’t forget to explore trusted retailers like Vibox, Amazon, and Scan, where you’ll often find fantastic combo deals on essential components.
To maximize your savings while building your dream gaming rig, consider these money-saving strategies:
- Sign up for price alerts on comparison websites and join PC building communities to catch lightning deals and flash sales
- Look for CPU and motherboard bundles, which typically offer better value than buying parts separately
- Consider slightly older generation components that still deliver excellent performance at reduced prices
You’re in luck because 2025’s market offers plenty of budget-friendly options without compromising on quality. With storage prices expected to rise up to 50% in the coming year, it’s wise to purchase all your storage drives during initial build. Like the affordable Maingear MG-1, you can find excellent entry-level components that leave room for future upgrades.
For instance, pairing an AMD Ryzen 5 5600G with a B550 motherboard gives you a solid foundation for future upgrades.
When shopping for parts, don’t forget to check second-hand marketplaces – just make sure any used components come with warranties.
Building Your Foundation
Building your dream gaming PC starts with understanding how your components work together – you wouldn’t want to buy a powerful CPU only to discover it’s incompatible with your motherboard.
Your power supply needs careful consideration too, since it’s the heart that keeps everything running smoothly and safely (trust me, you don’t want to skimp here). Modern builds typically require a 550W power supply to accommodate future upgrades and maintain system stability. A full-size tower case is recommended to ensure you have plenty of space for larger components and future upgrades.
Once you’ve got these fundamentals figured out, you’re ready to start picking out the exciting parts that’ll make your gaming rig truly shine.
Understanding Component Compatibility
Compatibility stands as the cornerstone of any successful PC build – get it wrong, and you’ll face frustrating returns, wasted money, or worse, damaged components.
When you’re planning your budget gaming rig, you’ll need to guarantee every part works harmoniously with the others, starting with your CPU and motherboard match-up. Storage form factors will also need to align with your motherboard’s supported interfaces. Using a tool like pcpartpicker.com can help verify component compatibility before purchase.
Think of your motherboard as the conductor of your PC orchestra – it needs to speak the same language as every component you’re plugging into it.
You’ll want to check three vital aspects before making any purchases:
- Socket type and chipset compatibility between your CPU and motherboard (like making sure your Intel 13th gen CPU matches with an LGA 1700 socket)
- RAM speed and type support (DDR4 vs. DDR5 – you can’t mix these!)
- Power supply requirements for your chosen GPU and other components
Don’t let the technical details overwhelm you – it’s actually pretty straightforward once you break it down.
Your motherboard’s specifications page will become your best friend during this process.
Remember, it’s far better to spend an extra hour double-checking compatibility than dealing with the headache of returning incompatible parts later.
Plus, proper component matching guarantees you’ll get the best performance from your budget-friendly build.
Planning Your Power Needs
Three critical aspects form the foundation of your gaming PC’s power requirements: component demands, system stability, and future upgrades.
You’ll want to carefully calculate your system’s power needs by adding up the wattage of each component – from your power-hungry GPU (75-350W) to those seemingly innocent RAM sticks (2-5W each). Based on real-world testing data, a high-end gaming system under load can cost up to $37.54 monthly for continuous operation. Using power calculators like Newegg’s tool can help determine your exact requirements.
Don’t let power planning intimidate you! For a budget gaming build, you’re probably looking at a 450W power supply, which’ll handle most entry-level setups with room to spare.
Here’s a pro tip: always add 20-30% extra capacity for those unexpected power spikes (trust me, your GPU can get pretty thirsty during intense gaming sessions).
Power And Cooling Management
With proper power and cooling management, your DIY gaming PC will run reliably for years to come.
You’ll want to start by selecting a high-quality power supply that matches your system’s needs – and don’t skimp here! A quality 500W PSU will serve you better than a cheap 800W unit that might fail when you need it most. Choosing a PSU with 80 Plus certification ensures better energy efficiency and long-term savings. For your CPU power plan, stick with AMD Ryzen Balanced mode to get that sweet spot between performance and efficiency. This plan will ensure quieter system operation while still delivering great gaming performance.
When it comes to cooling, you’ve got some exciting choices to make. While air coolers can definitely get the job done, a 240ml or 360ml liquid cooler will give you that extra thermal headroom you’re craving, especially if you’re planning to overclock later.
- Choose a PSU with at least 20-30% more wattage than your calculated needs
- Install a cooling solution rated above your CPU’s TDP
- Monitor your temperatures regularly using free software tools
Assembly Steps That Matter
Building a gaming PC might seem intimidating at first, but breaking it down into clear steps makes the process manageable and even enjoyable.
You’ll want to start with thorough preparation – gather your tools, clear your workspace, and don’t forget that anti-static wrist strap (unless you’re feeling particularly lucky with your expensive components!). Having a clean work surface is essential for organizing and protecting your components during assembly.
The real magic happens when you’re installing the critical components.
Think of your motherboard as the foundation of your gaming fortress – it needs to be mounted perfectly with all standoffs aligned. Checking for AMD or Intel compatibility with your chosen CPU is crucial before installation.
You’ll want to treat your CPU like a delicate masterpiece; it’s the brain of your operation, after all!
RAM installation is pretty straightforward – just remember to push until you hear that satisfying click.
For the graphics card – your gaming rig’s muscle – you’ll want to use the PCIe slot closest to the CPU for best performance.
Don’t forget to connect those power cables!
Once you’ve got everything in place, take extra time with cable management.
Trust me, your future self will thank you when it’s time for upgrades or troubleshooting.
Testing Your New Build
You’ll want to protect your investment by following key safety steps during that exciting first boot, including checking all power connections and using your motherboard box as a test bench.
Monitor your CPU and GPU temperatures, fan speeds, and voltage readings using free software like HWMonitor to guarantee everything’s running within spec.
Don’t skip the vital stress testing phase – run programs like Prime95 and Heaven Benchmark for at least an hour to confirm your system handles heavy loads without crashes or overheating.
First Boot Safety Steps
The first boot of a new gaming PC requires careful attention to safety and configuration details. Before you hit that power button, you’ll want to verify your BIOS settings are properly configured to avoid any startup issues.
Don’t worry – it’s easier than it sounds! Simply press the designated function key during startup (usually displayed on your screen) to access these vital settings.
Once you’re in the BIOS, there are three essential steps you can’t afford to skip:
- Set your boot drive order correctly – this tells your PC which drive contains your operating system
- Configure your system date and time to prevent software conflicts
- Enable XMP profiles for your RAM to enhance gaming performance
After saving your BIOS settings, you’ll want to disconnect from the internet temporarily while setting up Windows. This smart move lets you create a local user account, giving you more control over your system.
Once you’ve got Windows running, it’s time to stress test your components. Run tools like FurMark to verify everything’s working properly and your temperatures stay in check.
Keep an eye on those numbers – they’ll tell you if your cooling setup needs adjusting for maximum gaming performance.
Monitor Vital System Stats
A successful gaming PC build isn’t complete without proper system monitoring. You’ll want to set up essential monitoring tools like HWInfo or MSI Afterburner right away to keep an eye on your system’s fundamental signs – think of it as a health checkup for your new gaming rig!
Start by tracking your GPU temperature and usage percentage – if your GPU usage stays below 90% while gaming, you might’ve a CPU bottleneck on your hands.
Don’t forget to watch your CPU temperatures and per-core usage too; they’ll tell you if your processor’s breaking a sweat. With RAM becoming increasingly important for modern games, you’ll definitely want to monitor your memory usage, especially if you’re running 16GB or less.
Set up an on-screen display to track real-time stats while gaming – it’s like having a dashboard for your PC! You’ll see frame rates, temperatures, and usage percentages at a glance.
This makes it super easy to spot potential issues and tweak your settings for the best performance. Trust me, once you start monitoring these stats, you’ll wonder how you ever gamed without them!
Stress Test Your Components
Properly stress testing your new gaming PC components is absolutely vital before diving into any serious gaming sessions.
You’ll want to put your system through its paces to guarantee everything’s running smoothly and reliably. Start by downloading essential monitoring tools like HWMonitor or CoreTemp to keep track of those important temperatures and speeds while you’re testing.
- Run Prime95 for at least 30 minutes to push your CPU to its limits while watching those temperature readings like a hawk.
- Fire up Furmark to give your GPU a proper workout – but remember to stop if things get too toasty.
- Use OCCT for an all-in-one stability check that’ll test multiple components simultaneously.
Don’t skimp on this key step – it’s your early warning system for potential issues!
Keep your PC plugged directly into a wall outlet during testing, and make sure you’ve got proper ventilation before starting.
If you notice any crashes, freezes, or concerning temperature spikes, you’ll want to address those issues right away.
Think of it as your PC’s first workout session – you’re building a foundation for countless hours of smooth gaming ahead.
Cost-Saving Tips And Tricks
Budget-conscious gamers can maximize their build value through strategic component choices and smart shopping decisions. You’ll be amazed at how much you can save by choosing last-gen CPUs and mixing storage solutions – there’s no need to break the bank for amazing performance!
| Component | Smart Choice | Money-Saving Tip |
|---|---|---|
| CPU/GPU | Previous Gen | Wait for price drops after new releases |
| Memory | DDR4 RAM | Skip DDR5 unless absolutely needed |
| Storage | SSD + HDD Combo | Use SSD for OS, HDD for games |
| Power Supply | 80+ Certified | Match wattage to actual needs |
| Cooling | Stock/Basic Fans | Avoid expensive liquid cooling |
Let’s get practical: you don’t need the latest and greatest for every component. Consider the TeamGroup MP44L 1TB PCIe 4.0 SSD – it’s blazing fast but won’t empty your wallet. For power, the Thermaltake Smart 500W is perfect for modest builds. When it comes to cases, look for ones with included fans – you’ll save on cooling costs while maintaining great airflow. Remember, smart building isn’t about cutting corners; it’s about making informed choices that give you the best bang for your buck!
Future Upgrade Paths
Smart planning for future upgrades can multiply the value of your initial budget build. When you’re setting up your gaming PC, you’ll want to think about how each component can grow with your needs.
Start with a motherboard that’ll support next-gen CPUs and faster RAM – it’s like giving yourself a blank canvas for future masterpieces!
- Choose a motherboard with AMD’s AM5 socket or Intel’s latest platform – you’ll thank yourself when it’s time to upgrade your CPU without replacing the entire foundation.
- Invest in a power supply with extra headroom (aim for 750W or higher) – it’ll accommodate beefier GPUs and CPUs down the road.
- Pick a case with plenty of storage bays and good airflow – you’ll need the space when you’re adding those sweet SSDs later.
Don’t worry if you can’t afford top-tier components right now. Focus on creating a solid upgrade path by selecting a quality motherboard and PSU first.
You can always swap out your GPU, add more RAM, or upgrade to faster storage later. Remember, it’s easier to upgrade individual components than to replace everything at once!
Performance Optimization Guide
With your new gaming PC assembled, it’s time to squeeze every ounce of performance from your components.
Let’s turn your budget build into a gaming powerhouse with some smart optimization tricks that won’t cost you a dime!
Start by giving Windows a clean slate – uninstall those pesky bloatware programs and update your graphics drivers right away.
You’ll be amazed at how much smoother everything runs!
Next, immerse yourself in Windows settings and enable Game Mode – it’s like giving your games a VIP pass to your PC’s resources.
Don’t forget to crank up your power settings to “High Performance” mode; your PC’s been training for this!
For in-game settings, you’ll want to find that sweet spot between eye candy and performance.
Start with the basics: match your monitor’s native resolution, then dial back those resource-hungry settings like shadows and anti-aliasing until you hit your target frame rate.
If you’re feeling brave (and your cooling is up to snuff), you might even want to try some gentle overclocking – just remember to monitor those temperatures!
And here’s a pro tip: grab MSI Afterburner to keep an eye on your system’s essential signs while gaming.
Conclusion
Building your own budget gaming PC in 2025 doesn’t have to break the bank or stress you out. You’ve now got all the essential knowledge to create a powerful rig that’ll serve you well without emptying your wallet. Remember, it’s not just about saving money – it’s about crafting something uniquely yours. So grab those parts, follow the steps, and join the proud community of DIY PC builders. Your gaming adventure awaits!