Clean Up Your Gaming Rig: A Step-By-Step Guide To Internal Pc Cable Management
Building a powerful gaming PC starts with smart cable management inside the case. Neat wires don’t only make the rig look clean; they help parts run cooler and faster, giving a real boost to performance. Picture the PC as a finely tuned race car where every cable stays in its spot, letting the whole system zoom without getting slowed down. This shows simple tricks to organize cables and unlock the machine’s true power. Gamers wanting to squeeze every bit of speed and smoothness from their setup will benefit most. Keep reading to discover how straightening out cables can change the gaming world in surprising ways.
Whether you’re a beginner or advanced builder, this guide will help you maintain a neat and organized interior while still being able to access all the components quickly and easily. Plus, by following these steps, you’ll be able to free up more space inside your case for other upgrades down the line.
The process may seem daunting at first, but trust me – it’s really not as hard as it looks! With a few simple tools and a bit of patience, you can create a beautiful and efficient internal cable management system in no time. So let’s get started!
Introduction To Internal Pc Cable Management
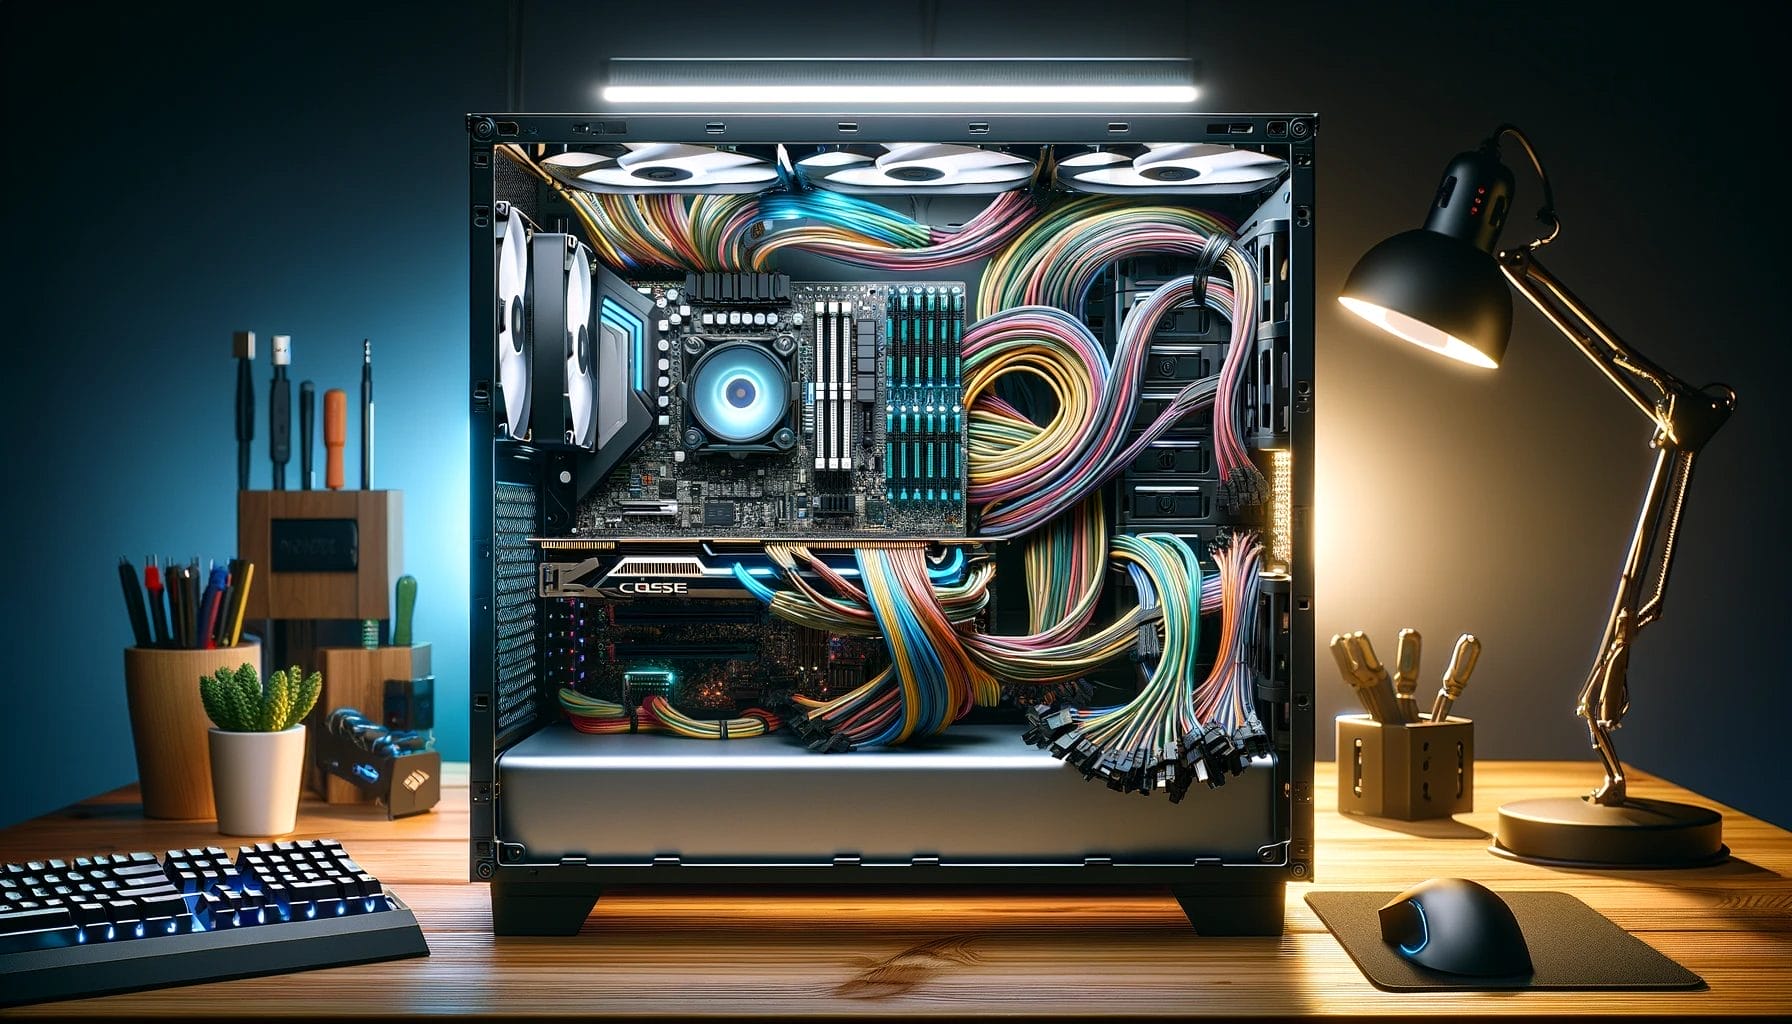
Are you fed up with your tangled mess of cables? Is your gaming rig a disaster and you want to clean it up? Let me be your guide on how to transform your chaotic computer into an organized piece of art. Internal PC cable management is the key to having an aesthetically pleasing setup, and I’m here to show you how!
First, let’s talk about why internal PC cable management is important. Having an organized setup makes sure that all the components are getting enough air circulation and has the added bonus of looking great too. Not only that, but it also helps prevent any loose connections or faulty wiring due to cables being pulled or snagged.
Organization is the name of the game when it comes to internal PC cable management. Taking some time to plan out where each component should go and how the cables will be routed will save a lot of headaches in the long run. It might seem daunting at first, but once you get started it won’t take long before everything’s in its place and your system looks like something from a dream.
Now that you know why internal PC cable management is important, let’s look at a step-by-step guide on how to do it yourself!
Necessary Materials For Cable Organization
Now that you have a basic understanding of internal PC cable management, it is time to gather all the necessary materials. Below are a few items you will need to begin organizing your gaming rig.
- Screwdriver: A screwdriver is essential for removing and replacing components as well as opening up the case.
- Cable ties: Cable ties are perfect for keeping cables bundled together while in your case.
- Zip ties: Zip ties are also very useful for keeping cables organized and tidy inside the case.
- Crimping tool/wire cutter: A crimping tool or wire cutter is needed if you plan on making custom cables for your build.
It is important to have all these items on hand when starting to clean up your gaming rig. Having a proper toolkit is key to ensuring that everything runs smoothly during the process and that no wires are damaged in the process. Make sure that all of these items are ready before proceeding with cable management in your PC build.
Route Your Cables For Optimal Performance
Cable management is like the icing on the cake for any gaming rig. It’s tedious, but it’s essential to optimizing your space and performance. Routing cables can be a daunting challenge, but with a little patience and organization you’ll have your cables looking spiffy in no time.
First off, let’s focus on where the cables will go. You want to route them away from areas that get hot – like exhaust fans and graphics cards – while also keeping them away from sharp edges that could damage them. Make sure to use cable ties or zip ties to keep them in place and secure. Taking note of how much slack is necessary for each cable depending on its length is also important so that they won’t be too tight or too loose.
Next up, you should think about the order in which you’ll start routing your cables. Aim to have all the power cables connected first before moving onto data cables such as SATA or USB cords. This will help organize your build while giving yourself enough room when plugging everything in. Knowing how many inches of slack you need between each component will help here as well; it’ll make things easier for both connecting and disconnecting components down the line.
Organizing your system’s interior by routing each cable properly can be a great way to improve the performance of your gaming rig while also making it look better aesthetically. With a bit of effort put into it, you’ll have an organized gaming rig ready to pull off some serious feats!
Identify And Label Every Cable
Once you’ve routed your cables, the next step is to identify and label each one. This will make it easier to locate specific cables when changing or upgrading components in the future. To begin, unplug all of the power connectors from their respective components. Then, examine each cable carefully to determine what component it’s connected to. Make sure you keep a list of each one so that you can refer back to it for labeling purposes.
Next, create labels for each cable using a permanent marker. Make sure your labeling system is simple and easy to understand. Clear labels are best so you don’t have to guess at which cable goes where while building or upgrading your gaming rig in the future. You can also use colored tape along with labels if it helps you better differentiate between cables that look similar but are used for different components.
Organizing and labeling your cables is an important part of any gaming rig build or upgrade project. It makes troubleshooting easier in case something ever goes wrong, and also allows for quick identification of any new cables when adding additional components down the line. Investing some time now into properly identifying and labeling your PC’s internal cabling will pay off in the long run!
Group Cables Together Strategically
Now that you’ve identified the cables in your gaming rig, it’s time to start organizing them. Strategically grouping your PC cables is key for a successful cable organization and internal management. Here are some tips on how to approach this:
- Start by grouping together cables that share similar functions – for example, all of the power supply cables should be grouped together.
- Label each group of cables with an adhesive label or piece of tape so you can easily identify them later on. This will save you a ton of time down the road!
- Utilize cable ties and zip ties to keep each group of cables organized and secure.
With these steps, you’ll have a good foundation to begin organizing your gaming rig’s internal components. By grouping all of your PC cables strategically, it will be easier to access and troubleshoot any issues that may arise in the future. Additionally, it will make it easier to install additional components or upgrades when necessary. Taking the time now to organize your PC’s interior will pay off in spades down the line!
Use Modular Power Supplies
Modular power supplies are essential for any gaming rig. Installing one can provide numerous benefits, such as improved cable management and easier maintenance. With a modular power supply, you can choose which cables to use and which to leave out, meaning you won’t have a tangled mess of cords cluttering the inside of your PC. This is especially beneficial if you’re looking to make your gaming setup look more aesthetically pleasing.
When it comes to installation, modular power supplies are much easier to work with than traditional ones. You simply have to connect the cables where they’re needed instead of having them all come in one bundle. This makes the process less time consuming and far less stressful. Additionally, modular power supplies allow you to add or remove components with ease since it’s easy to disconnect cables when necessary.
Overall, using a modular power supply is an excellent way to make your gaming rig look neat and tidy. It also helps keep your setup organized so you can easily access the various components without having to struggle through a tangled mess of wires. All in all, installing a modular power supply is highly recommended for anyone who wants an efficient and well-organized gaming rig.
Appropriate Sizing For Cable Ties And Zip Ties
Now that you have chosen the perfect modular power supply to power your gaming rig, it is time to take on the task of cable management. Appropriate sizing of cable ties and zip ties will ensure your cables are organized in a neat and tidy fashion.
When choosing the size for your cable ties and zip ties, you want to make sure that they are not too large or too small. If they are too large, your cables may end up looking bulky and unsightly. On the other hand, if they are too small, your cables may not be held securely in place. It’s important to find the sweet spot between these two extremes.
A good rule of thumb is to use a cable tie that is about one-third the diameter of the cable you’re managing. As for length, always err on the side of caution by using a tie that is slightly longer than necessary so you can ensure a snug fit without having to worry about it slipping off over time. Zip ties should also be sized according to width and length – making sure they’re wide enough for proper gripping but not so wide that they become cumbersome or difficult to work with.
When it comes down to it, finding the right size for cable ties and zip ties can be tricky business. However, with a little bit of trial and error (and some careful measuring) you should be able to find exactly what works best for your setup!
Desk Cable Management Tips And Tricks
Desk cable management is a critical but often overlooked element of setting up a gaming PC. It’s important to have an organized and tidy desk setup, not just for aesthetic purposes, but also for airflow and functionality. Here are some desk cable management tips and tricks to keep your gaming rig looking nice and neat.
Start by organizing the cables on your desk into bundles with zip ties or velcro straps. This will create a cleaner look and make it easier to route the cables where you need them. If there are any long cables that won’t fit within the bundle, use external cable management solutions like clips or cable trays to keep them in place. Additionally, make sure all of the cables are routed away from any fans or vents so they don’t impede air flow.
Finally, consider investing in a gaming desk that has built-in cable management features like grommets or channels for routing cables out of sight. This way you can achieve an even tidier look without having to worry about managing all of those pesky wires yourself! A well-organized gaming setup can be both aesthetically pleasing and functional – so take the time to perfect your PC’s cable management system!
Sata Cables And Power Supplies
SATA cables and power supplies are the lifeblood of your gaming rig. Without them, you’d be left with nothing but a pile of metal and plastic! As daunting as it may seem, getting your SATA cables and power supplies organized is an absolute must if you want to have a functional gaming setup.
The first step is to identify which type of power supply you have. This will determine the kind of power connectors you’ll need for your storage devices, hard drives, etc. Once you’ve identified the type of power supply, the next step is to insert any necessary cables into their corresponding slots on your motherboard. Depending on the size and complexity of your gaming rig, this can involve a lot of maneuvering in tight spaces. But don’t worry – a bit of patience goes a long way here!
After all your cables are connected properly, it’s time to make sure everything powers up correctly. Check that all fans are running and that there are no flashing lights or error messages on your motherboard. Then fire up some games and test out how well they run – if everything is running smoothly, then congratulations! You’ve successfully cleaned up your gaming rig in style!
Properly Secure All Connections
Once all the cables are organized and routed in your PC build, it’s time to make sure they’re securely connected. This is a critical part of any gaming system build. To ensure that everything is correctly and securely connected, start by tightening each connection snugly with the appropriate tools. Make sure that all the screws, pins, clips and other connectors are properly secured. Once you’ve checked all of these connections, use a few zip ties to keep your cables nice and tidy. This will help reduce clutter inside your PC case and make troubleshooting easier if an issue arises in the future.
When it comes to internal cable management for your gaming rig, properly securing all connections is just as important as organizing them. Pay close attention to each connector and make sure that it’s tightened down correctly and securely before moving on to the next step. Taking the time to do this now will save you headaches later down the road when it comes time to troubleshoot any issues or upgrade components in your system.
In order to ensure that all components function properly, always remember to securely-connect every component before powering up your gaming rig for the first time – from CPU fans, storage drives, power supplies and graphics cards – double check every connection before turning on your system!
Creative Solutions To Keeping Cables Organized Inside The Pc
Organizing the interior of your gaming PC is a critical step to keeping things running smoothly for the long term. Creative solutions are key to getting a neat, ordered look inside your rig. The most important thing is to find ways to keep cables organized and out of the way.
One way to do this is by using cable ties or zip ties to bundle cables together. This not only saves space, but also makes it easy to identify and access specific cables when needed. It also prevents cables from becoming tangled or snagged inside the PC. Another great idea is to use cable management sleeves and clips, which can help you easily store and organize all your cords in an efficient manner.
Finally, you can take advantage of additional features such as grommets and pass-throughs that come with certain cases and motherboards. They allow you to route cables through them while still keeping them hidden from view – resulting in a clean, streamlined look inside your PC. With these creative solutions, you can make sure that your gaming rig stays organized for the long run!
Ideas For Managing External Cables Outside Of The Pc Case
Now that you’ve tackled the internal aspects of cable management, it’s time to turn our attention to the outside of your gaming rig. External cable management is essential for a clean and organized setup, as well as making future upgrades simpler. First off, proper external cable routing is key. Keeping cables tidy and out of the way will help improve airflow throughout your PC and reduce clutter. To start, group cables together with zip ties or velcro straps so they don’t get tangled up. Then route them behind the PC case or along the edges of your desk.
Next, label all your cables to make maintenance easier in the future. This will help you keep track of which ones go where, especially if you have multiple components connected at once. Lastly, consider using external cable organizers like clips and hooks to further declutter your workspace. These tools can help hold wires in place while also adding extra protection against accidental damage from pets or kids.
No matter how much work you put into organizing your cables externally, dust can still accumulate over time and cause problems with your system’s performance and aesthetics. To avoid this issue, it’s always good practice to regularly clean out your gaming rig by dusting off components or using a can of compressed air to blow away any dirt or buildup from fans and other parts inside and outside the case.
Considerations During Assembly Or Re-Assembly Of Components
Did you know that a clean, well-ordered gaming rig can reduce your system’s temperature by up to 5°C? This is just one of the many benefits of effective cable management. When assembling or re-assembling your PC components, there are several considerations to keep in mind in order to maximize the efficiency and aesthetics of your gaming rig:
- PC Case Size: The size of your case will determine how much space is available for components and cabling. If you have a smaller case, it may be more difficult to properly organize cables.
- Component Layout: Think ahead when deciding where each component should go. Make sure that cables are not blocking airflow pathways, and that all components fit comfortably within the case.
- Cable Lengths: Investing in high quality cables with adequate length will make it easier to manage them inside your case. Consider using modular cables that can be adjusted or removed completely if necessary.
- Cable Clamps & Management Tools: Using cable clamps and zip ties can help keep things organized while routing cables behind the motherboard tray. There are also special tools available for cable management, such as velcro straps and clips which can help hold cables together tightly and securely.
No matter what size or shape your PC is, following these tips will help ensure you have a clean, orderly gaming rig that runs efficiently and looks good too!
Troubleshooting Tips In Case Of Issues With Internal Cable Management
When it comes to your gaming rig, internal cable management can make or break the success of your build. It is important to troubleshoot any issues that you may encounter during the cable routing process. The following tips will help you get your cables routed properly and ensure that all of your connections are secure.
First, check for any loose connections with an ohm meter. A loose connection can cause problems ranging from a system crash to a complete power failure. If a connection isn’t tight enough, make sure to tighten it or replace the part entirely if necessary.
Second, take the time to organize your cables in the PC case. While organizing cables may seem like an unnecessary step, it can save you time and energy in the long run when trying to troubleshoot any problems down the line. Make sure that all of your wires are properly labeled and tucked away neatly so as not to be tangled up with one another.
Finally, take a look at where each cable is routed within the case. If they are not routed neatly and properly, they could be causing interference with other components in your setup which would lead to performance issues or even complete system failure. Make sure each cable is routed according to manufacturer specifications and is out of the way of airflow paths within the case for maximum cooling efficiency.
Long-Term Benefits Of Internal Pc Cable Management
Internal PC cable management is not just a one-time job. It can provide long-term efficiency and benefits that go beyond the instant satisfaction of having a neat, tidy gaming rig. With good internal cable management, you’ll have less maintenance to worry about down the line. You’ll also enjoy enhanced airflow due to improved airflow paths within your case, which helps keep temperatures lower and your components cooler. Good internal PC cable management will also improve the aesthetics of your gaming rig, making it look much neater and more pleasant to look at. Finally, with properly managed cables inside your case, you’ll see increased durability in all of your components due to better heat dissipation and circulation within the case.
It’s clear that taking the time to clean up and manage the cables of your gaming rig can make a huge difference in its longevity, functionality, and overall performance capabilities. The long-term benefits from proper internal PC cable management are well worth the effort you put into it. So be sure to take the time needed for setting up an efficient system for managing your internal cables – it will pay off in spades over time!
Conclusion
As a gaming PC build expert, I’m proud to say that I’ve successfully guided you through the steps of cleaning up your gaming rig. With careful cable management, you can ensure optimal performance as well as reduce clutter. My advice is to take it slow and get familiar with the process before diving into it. It’s important to label cables and double-check connections before closing up the PC case.
Creative solutions can be used to keep cables organized inside the PC – zip ties and velcro strips are great for this purpose. Additionally, external components may require special considerations when managing cables outside of the PC case. It’s also important to make sure that there are no potential issues during re-assembly.
Cleaning up your gaming rig doesn’t have to be intimidating or overwhelming – just remember to take your time, follow these steps, and you’ll be able to enjoy an optimally performing machine in no time!
What Is The Best Way To Route Cables Inside The Case To Ensure Optimal Performance?
When it comes to cable routing inside your case, there’s no one-size-fits-all answer. Every PC layout is different and each user has their own personal preference when it comes to how they want their cables to be routed. However, there are some general tips you can use to ensure that your cables are routed in the most optimal way, for the best performance possible.
First of all, you’ll want to consider the overall layout of your PC case and where you plan on placing components such as the CPU cooler and GPU. This will help determine how you’ll route your cables in order to achieve a neat, organized look. You should also plan out exactly which cables need to go where before beginning the process of routing them within the case.
In order to get optimal performance from your PC’s cabling setup, here’s a 4-step guide:
1. Start by organizing all of your pc cables into groups based on what component they belong too.
2. Route each group of pc cables through separate paths so that they don’t interfere with each other or block airflow in areas around components like the GPU or CPU cooler.
3. Use cable ties or zip ties whenever possible to keep things neat and tidy while preventing interference with other components inside your case.
4. Finally, check over everything once more after installation is complete just to make sure that all of your cables are properly secured and routed correctly for optimal performance.
If done right, following these steps can help give you an organized, efficient setup with minimal impact on airflow and overall system performance – which is exactly what every gaming PC build expert wants!
Are There Any Special Considerations For Managing External Cables Outside Of The Pc Case?
Are there any special considerations for managing external cables outside of the PC case? When it comes to external cable management, there are a few extra steps you should take compared to internal wiring. It’s important to make sure that all external cables are routed properly and organized in order to maximize performance and efficiency.
When dealing with external pc case cables, it is essential to ensure that they do not interfere with each other or obstruct air flow. This may require extra cable organizing or routing, depending on the type and placement of your components. Additionally, it is important to keep the cables away from anything that could generate additional heat such as power supplies or GPU fans.
In order to properly manage your external wiring, you should have a plan in mind before you begin. Determine where each cable will be connected and how it should be routed so that it does not interfere with other components or cause any clutter. If needed, you can purchase additional cable ties and velcro straps for organizing your cabling. Taking the time to route your cables correctly will help ensure optimal performance for your PC and make future upgrades easier down the line.
Overall, proper cable management is an important part of building any gaming PC – both inside and outside of the case. By following these tips, you can ensure that all of your cables are managed appropriately so that you can get the most out of your gaming rig!
Are There Any Potential Issues I Should Be Aware Of When Re-Assembling Components?
Re-assembling components can be a tricky task. There are potential issues to consider when re-assembling components to build or upgrade your gaming PC. It’s important to pay attention to each step in the process and ensure that everything is connected correctly. In this article, we will discuss some of the potential issues you should be aware of when re-assembling components.
When re-assembling components, there are a few things you should keep in mind to avoid any issues with PC assembly. First and foremost, proper cable management is essential for success. If cables are not routed properly, it can lead to problems with airflow and cause your system to overheat.
Additionally, if wires are not secured or attached properly, they could become loose or disconnected during regular use, leading to further problems down the line. Lastly, make sure that all connectors are securely plugged into their respective sockets before closing up the case – this will help prevent any potential damage due to incorrect wiring.
To sum up, there are some potential issues you should be aware of when re-assembling components:
1. Make sure cables are routed properly for optimal airflow
2. Secure all wires tightly so they don’t become loose
3. Double-check that all connectors are plugged into their respective sockets before closing the case
When building or upgrading your gaming PC, these tips will help you avoid any problems related to PC re-assembly and cable management issues. As an experienced Gaming PC Build Expert, I strongly recommend taking the time to double-check every connection and ensuring everything is secure before moving on – it could save you from a lot of headaches down the line!
Is It Necessary To Label Every Cable?
Ah, the age-old question: Is cable labeling necessary? It’s a debate that has been going on for ages, and with good reason. On one hand, you have the Cable Management Enthusiasts who are adamant about labeling every single cable in their gaming rigs. And on the other side of the fence, you have the Cable Management Avoiders who don’t think it’s necessary to label any cables at all. Which side is right? Well, as an experienced Gaming PC Build Expert I’m here to tell you that cable labeling is a must!
First of all, labelling your cables makes them easier to identify when it comes time to reassemble components. Not only can it save you time and frustration if something goes wrong during reassembly but it’ll also help ensure everything gets put back together correctly. Plus, it looks much neater when everything is labeled and organized properly.
Labeling your cables may seem like a tedious process but it’s actually quite simple. All you need is a permanent marker or some adhesive labels and then just label each cable according to its purpose. This way, you’ll know exactly which cable goes where and which ones go together without having to guess or try to remember what goes where. Additionally, labeling your cables can also make troubleshooting easier in case something does go wrong down the line. By simply looking at the labels on each cable, you can quickly identify any potential issues without having to waste time trying to figure out what’s connected where.
So there you have it – proper cable labeling is an essential part of any successful gaming rig build! Don’t be one of those poor souls who doesn’t bother with organizing their cables – trust me – they will regret it later! Invest in some good quality adhesive labels or use permanent markers and get into the habit of properly labeling your cables for maximum efficiency and organization in your gaming rig setup!
What Are Some Creative Solutions I Can Use To Keep Cables Organized Inside The Pc?
Organizing cables inside a gaming PC can be a daunting task. There are numerous creative solutions available to help you manage the wires and keep your gaming rig clean and organized. From cable routing to clutter management, here are some helpful ideas for keeping your PC organized.
Cable routing is essential when it comes to organizing your gaming PC. It can help you avoid any tangled mess of wires, which can make it difficult to find the right one when you need it. Invest in some zip ties and use them to secure cables together and route them along the back or side of the case. This will allow for a neat and tidy look, as well as easy access when needed.
When it comes to cable organization, there are many options available that will help you keep all your cables in order. Consider using adhesive cable clips or Velcro strips to keep every wire where it needs to be. You may also want to invest in some sleeved cables that can be easily routed around corners and other tight spots inside the case. This will give your gaming rig a more aesthetically pleasing look while also keeping everything organized.
Finally, clutter management is key when it comes to keeping things tidy inside your gaming PC build. Make sure all unused ports are covered with blanking plates or dust covers so dust doesn’t get inside your system and cause damage. You should also consider investing in an anti-static wrist strap if you plan on doing any internal work on your system, such as swapping out components or adding additional hardware down the line. As an expert in Gaming PC builds, I highly recommend taking these steps for efficient cable management within a gaming rig setup!